Yagasuri x Flower Stamping Mani

Monday, June 29, 2015 6 Comments A+ a-

July 15th Update: I replaced the video at the end of this post with YouTube version.

I was so excited about my nail mail I received from Harunouta (see previous post), that I started creating a design even before I posted that review post. This is the first design I created.

For this mani, I started off with JOSS Will Not (white) for all my nails. I stamped Yagasuri pattern (one of the Japanese traditional patterns) from BP-67 on thumb, middle finger & ring finger using Ya Qin An Purple. Then I made a stamping decal out of flowers on hehe 051 using Mundo de Uñas White, coloured in with red, fresh gree, and orange, and placed it onto those nails. I added a dot on the centre of each flower using JOSS More Nail Gold with a dotting tool, and finished off with Glisten & Glow HK Girl topcoat. For pointer and pinkie, I made a stamping decal out of Yagasuri pattern again, cut it diagonally and placed onto these 2 nails.

Ever since I saw this Yagasuri pattern on BP-67 plate, I've been wanting to create this design. This pattern is seen lots on Hakama (Japanese traditional outfit worn at graduation ceremony) and I've been searching on internet to find what colours to go for. Then I saw this Hakama and thought, geez this is pretty! So here it is. I'm super duper happy with this mani and already feeling sad at the thought of removing it.

7/15更新:記事最後の動画をYouTube版に置き換えました。 

前回の記事で春の歌から送っていただいた製品を使ったネイル第1弾。タイトルは「矢絣と花」にしましたが、別称「はいからさんが通るネイル」。出来上がりはこちら。

Finished product, with Glisten & Glow HK Girl topcoat. Cloudy shot

ベースは全爪JOSS Will Not(白)。BP-67の矢絣柄をYa Qin An Purpleで親指、中指、薬指にスタンプ。次に、hehe 051の花柄をMundo de Uñas Whiteでスタンプしてdecal作成。赤、黄緑、オレンジで色付けしてこの3本の爪に乗せる。花の中心にJOSS More Nail Goldとドット棒でドットを追加し、Glisten & Glow HK Girlトップコートで仕上げ。人差し指と小指は同じく矢絣柄でdecalを作成し、斜めに切って乗せる。

使用ポリッシュはこちら。

Polishes used

左から、

Ya Qin An Purple
Sinful Colors Innocent
KIKO Melon
JOSS Dazzling
JOSS More Nail Gold

As I said in my review post, this purple stamping polish is amazingly opaque.
I found it bleed a bit upon topcoating, so I suggest waiting a bit longer for it to dry before topcoat

いつも1つのデザインを思いつくまでにあーだこーだするカシスも、このネイルばかりはちっとも迷いませんでした。BP-67の矢絣柄を見たときから「袴ネイルまたやる!」と思っていろいろ画像をググっていたのです。それで見つけたのがこちらの袴。か・・・可愛い!(゚∀゚) ということで色合いをそのまま採用させていただきました。この紫の矢絣、いかにも「はいからさんが通る」じゃないですか?矢絣ネイルに打ってつけな完璧な紫。

I can't get enough of Japanese themed manis. You'll see lots from me in the future :)

ただ、このYan Qin An Purple、1つ気になった点があります。トップコートしたとき、それからdecal作成時にクリアポリッシュをスタンパーに塗ったときに、色が滲みやすいです。滲まないようポリッシュをよくよく乾かすこと、それからトップコート/クリアのブラシがポリッシュになるべく触れないように塗ることをお勧めします。

あまり頭を悩まさずにできたこのネイル、非常に気に入りました。大正時代の女学生気分。日本の方は「和ネイルだ!」ってすぐに気付くと思いますが、海外の方は和ネイルって気付いたでしょうか?どんな風に映ったか少し気になります。


にほんブログ村 美容ブログ 自爪ネイルへ

Harunouta - hehe Plates, Ya Qin An Stamper / Polishes & Born Pretty Plates Review

Friday, June 26, 2015 6 Comments A+ a-

Harunouta contacted me yet again if I would like to do some review of their products. For those who don't know, Harunouta is basically a Born Pretty Store we all know well but is catered for Japanese customers (hence, their website is in Japanese). This time, I was able to try out their new hehe plates, new-to-me brand Ya Qin An stamper & stamping polishes, and some BP plates. It only took 16 days to get here. Ready for another long review? Here we go.

今回は何度目かの春の歌の製品レビューです。「春の歌」をご存知ない方はもうほとんどいないと思いますが、Born Pretty Storeの商品を扱う日本語のサイトです。今回は初めましてのheheブランドのプレート、Ya Qin Anスタンパーとスタンピングポリッシュ、それからいつものBPプレートとかなり豪華なラインアップなので、ちょっとワクワクしております。発送から到着までは16日ほど。ではいつもの長いレビュー、行ってみましょう。


This is what I received. 3 hehe plates, 2 BP round plates, 4 BP rectangle plates, Ya Qin An stamper set, and 2 Ya Qin An stamping polishes. Stamper set and polishes were carefully wrapped in bubble wraps.

これが受け取った品々。heheプレート3枚、BP丸プレート2枚、BP長方形プレート4枚、Ya Qin Anスタンパーセット、Ya Qin Anスタンピングポリッシュ2本。スタンパーセットとポリッシュは緩衝材で厳重に包装されてきました。


I'll show you the stamper set first. You can buy this item from this page. It comes with a double-sided stamper, small scraper, and a buffer. Size is as shown in the pic. Buffer is there to 'prime' the stamper. I'll talk about it later. 

まずはスタンパーセットから。商品ページはこちら。中身はダブルサイドスタンパー、小さめのスクレイパー、それからバッファー。大きさはそれぞれ画像にあるとおり。バッファーはスタンパーをprimeするためのもの。これについては後ほど。


Size of the stamper heads is 3cm (big side) and 2.65cm (small side) in diameter. The big side is bigger than a normal round stamper in the market (shown here are Fab Ur nails & Messy Mansion) and the small side is a little bit smaller.

スタンパーヘッドの大きさ。大きい方は直径3cm、小さい方は2.65cm。市場に出回っている一般的な丸スタンパーは2.7cm(画像はFab Ur NailsとMessy Mansionのもの)なので、大きい方は1周り大きく、小さい方は若干小さ目。


Color is white as you can see. As for squishiness, I would say this is squishy firm. Both heads are about the same squishiness, and firmer than Fab Ur Nails (review post here) and Messy Mansion coloured heads (review post here).

色は見てのとおり白。柔らかさについては、いわゆるsquishy firmと呼ばれるもの。Fab Ur Nails(レビューはこちら)やMessy Mansionカラーヘッド(レビューはこちら)などと比べて一段硬いタイプです。


Scraper is hardly bendable, just as I like it. I find this too small for my liking, so I'll keep using my Messy Mansion scraper.

スクレイパーはクレジットカードなどと同じぐらいの硬さです。個人的に柔らかいスクレイパーが好きではないのでこれはアリですね。ただし、だいぶ小さいので引き続きMessy Mansionのスクレイパーを使っていく予定。


Soooo, the most important part. How do these stamper heads perform? I first tried unprimed. I used the same plate & stamping polish I always do with test stamps - Dashica Infinity 70 & Mundo de Uñas. 

OK, what happened to this small head!? The polish just dissolved on it! Both heads have shine to the surface, and also are slightly oily, so I decided to wash them with warm soapy water and then prime them.

さて一番肝心な点。スタンパーが柄をピックアップするか?Primeなしでまずトライ。いつもテストスタンプに使っているDashica Infinity 70とMundo de Uñasを今回も使用。

あれあれ、小さいヘッドの方どうしたんでしょう?ポリッシュが溶けてますよ!どちらのヘッドも表面がテカテカなのに加えて、やや油膜が張っているので、まずぬるま湯に浸けて石鹸で洗ってから乾かし、さらにPrimeしてみました。


I decided to simply use my melamine foam sponge (Magic Eraser as called in US) instead of a buffer that comes with the set. Buffer is double-sided, but both sides are more coarse than melamine sponge, so it could damage the heads if you over-prime them.

Primeにはセットに付いてくるバッファーではなく、メラミンスポンジ(激落ちくんなど)でやりました。バッファーはメラミンスポンジよりも粗いので、やり過ぎるとヘッドがボロボロになる可能性があります。


This is after priming. Looks much better, especially the small head. I still see bald spots on the big one though.

そしてこれがPrime後。特に小さいヘッドの方、だいぶましになりましたね。大きい方はまだ欠けが見られますが。


I tried on paper also. Left is unprimed, right is primed.

紙でも一応試してみました。左がPrime前、右がPrime後。


Continued on with other patterns. The top row is done with the big head, and the bottom row the small head, both after priming. I noticed the polish started to dissolve on the small head as I did more test. I have enough working stampers already, so I don't see myself reaching for this stamper that often. Although, the size of the big head may be appealing to those who prefer bigger head.

他の柄でもテスト。上の段が大きいヘッド、下の段は小さいヘッドによるもの。どちらもPrime後です。スタンプしていくうちに、小さい方のヘッドでまたポリッシュが溶け始めました(;▽;) 早くスタンプすればそれほど目立つわけではないですが、スタンパーに関しては既に良質なスタンパーをたくさん持っているので、このスタンパーに手が伸びる機会は少なそうです。ただ、爪が長い方などはこの大きいヘッドは重宝するかもしれないですね。


Next up is Ya Qin An stamping polishes. You can buy from this page. I chose Purple and Chocolate, and they are 15ml. Honestly, I have too many Mundo de Uñas polishes, and I wasn't in need of another brand. I wan't expecting much of these either.

お次はYa Qin Anというブランドのスタンピングポリッシュ。商品ページはこちら。私が選んだのはPurpleとChocolateで、どちらも15ml。正直なところ、Mundo de Uñasとこっぴさんからいただいたスタンピングポリッシュで十分まかなえているので、あまりこの2本に期待はかけていませんでした。


Anyway, I tried out with my usual Dashica Infinity 70. Stamper I used is my trusty Messy Mansion rectangle.

O.M.G...!! I instantly fell in love with these as soon as I applied them on the plate. They are very thick and opaque, just like Mundo de Uñas. 

まぁともかく、いつものDashica Infinity 70で試してみました。使ったスタンパーは愛用のMessy Mansion長方形スタンパー。

プレートに1滴目を垂らした瞬間・・・思わずハッとしました。これ、ものすごく濃いですよ!まさにMundo de Uñasのよう。水っぽいしゃばしゃばな感じがないので、Mundoと同じく少量でよく伸びます。


They are very opaque, they even leave some on the stamper AFTER I stamp on paper. This only happens with opaque stamping polish & nicely etched plates.

その証拠がこちら。紙にスタンプした後に、スタンパーにこんなにポリッシュが残るんです。これは濃いポリッシュと彫りがしっかりしたプレートの組み合わせじゃないと見られません。しゃばしゃばポリッシュではこうはなりません。


One downside is that the Purple stains my stamper! :'( I remember my MdU Purple stains also. I had to switch to my Messy Mansion pink stamper heads for test stamps afterwards.

1つがっかりなのが、Purpleの方、スタンパーに染みがつきます(;▽;) そういえばMundo Purpleも同じく染みになるんだった。なので、これ以降のテストスタンプはMessy Mansionのピンクヘッドに切り替えています。


Comparison with my other similar colour. Left is Mundo de Uñas Cafe. This gets quite gooey over time and is getting hard to work with, so I was looking for an alternative.

手持ちの似た色との比較。左はMundo de Uñas Cafe。この色、時間が経ってかなりねっちょりして使いにくくなってきたので、他の茶系を探していました。


And this is Mundo de Uñas Purple on the left. These two look quite different in colours looking at bottles.

そしてこちらの左はMundo de Uñas Purple。ボトルで見る限りこの2本はだいぶ色味が違いますね。


Right of the dash line is Mundo de Uñas Cafe (top) and Purple (bottom), compared to Ya Qin An on the left. I'm glad they are quite different.

点線の右側がMundo de Uñas Cafe(上)とPurple(下)、左側がYa Qin An。紙で見るとどちらもだいぶ違う色で嬉しい\(^o^)/


They are darker colours so I didn't think they would stamp well over black, but I tried anyway. I was surprised that they are quite visible. 

Overall, I'm super happy with these stamping polishes. I'm so tempted to get more colours. They don't have nasty smells like some of Mundo de Uñas polishes. If you find MdU isn't for you, these can be a great alternative.

元々暗い色なので黒の上では発色しないと思いましたが、一応試してみました。意外や意外、結構見えてますね(゚∀゚)。でもまぁ、実際使うときは白ベースで使うと思います。

あまり期待していなかったこのスタンピングポリッシュ、100点満点です。別の色も欲しくなるクオリティですね。Mundoのような強烈な臭いもないです。Mundoが苦手な方はこちらを試してみるといいと思います。


Lastly, stamping plates. These 3 are hehe 044, 048 and 051. hehe plates are not available on Born Pretty Store at the moment, but you can find them on Harunouta website (on this page). Plate size is 5.6cm in diameter, same size with Born Pretty round, Bundle Monster, and Konads. I've been most excited to try these. Look at them, full of Japanese & Chinese patterns! *swoon*

最後にスタンピングプレートのご紹介。こちらの3枚はhehe 044、048、051。heheシリーズの商品ページはこちら。プレートのサイズはBorn Pretty、Bundle Monster、Konadなんかと同じ直径5.6cm。heheプレートはAliExpressで売っているのを見て、ずっと欲しいな~と思っていました。だって見てくださいよ、この和風&中華風の柄を(゚∀゚)


One round plate from BP series. This is BP-67. Product page is here. I was sent 2 of this same plate by mistake. I couldn't get my eyes off the pattern on the top right. It's one of the Japanese traditional patterns called 'Yagasuri'. Another essential stamp in doing a Japanese themed nail art.

BP丸プレートからは1枚、BP-67。商品ページはこちら。このプレート、なぜか2枚入ってました。サイトで見ていても思わず素通りしそうになるシンプルなプレートですが、右上の柄に注目。こ、、これは・・・「矢絣(やがすり)」ではないですか!!(大興奮)。和ネイルに欠かせない柄がここにも1つ\(^o^)/


Four BP-L series plates, BP-L009, L010, L017, and L021. You can find them on this page.

そしてBP-Lシリーズの4枚、BP-L009、L010、L017、L021。BPシリーズの商品ページはこちら


Test on paper. Stamping polishes are Ya Qin An, now that I know they work very well. Stampers are Messy Mansion rectangle & pink round. They are nicely etched and I couldn't contain my excitement swatching those Asian plates! 

紙へのテスト。スタンピングポリッシュは品質がいいと分かったのでYa Qin Anの2本を使用。スタンパーはMessy Mansion長方形とピンクヘッド。プレートはどれもきちんとした彫りです。このアジアプレートをswatchしている間、頭の中にはもういくつかデザイン案が浮かんできましたよ(゚∀゚)


I'm most excited about these flying cranes. Flying crane is one of the most essential elements for Japanese patterns, and you can see them lots on kimonos.

一番欲しかった飛ぶ鶴のスタンプ・・・ようやく入手できて感動(;▽;) 和風プレートは数多あれど、飛ぶ鶴の柄は皆無と言っていいぐらいだったので、このheheプレートを初めて見たときは大興奮でした。これだよ、欲しかったのは。もう少し小さいと嬉しかったのですが、贅沢は言わない!


BP-L009. Heaps of geometrics. I've been wanting that diamond pattern at top right. Full size images are 2.0cm x 1.4cm.

BP-L009。幾何学模様いっぱい。一番欲しかったのは右上のダイヤの柄。フルサイズの柄のサイズは2.0cm x 1.4cm。


BP-L010, Tribal plate. Such a cool plate and I love it! Size for the full size images is also 2.0cm x 1.4cm.

BP-L010、トライバルプレート。めちゃカッコいい柄いっぱい\(^o^)/ こちらもフルサイズの柄は2.0cm x 1.4cm。


BP-L017, summer plate. Another super pretty plate, and I've already see so many nail arts done with this one. Full size pattern is a bit smaller, 1.8cm x 1.4cm.

BP-L017、サマープレート。こちらも素敵な柄がいっぱい。既にこのプレートを使ったネイルをたくさん見ました。フルサイズの柄はやや小さ目の1.8cm x 1.4cm。


BP-L021, silhouette plate. I had a bit of trouble with this one. Very fine parts like ballerina arm and unicorn horn are hard to pick up, so are those with big negative space (hollow part) like on the bottom row. You might want to scrape very slowly & lightly with these stamps.

BP-L021、シルエットプレート。このプレート、少しトリッキーでした。バレリーナの腕とかユニコーンの角など、非常に細い線が拾いにくかったです。一番下の段のnegative space(くぼんだ部分)が多い柄もしかり。こういう柄はゆっくり&軽めにスクレイプすると吉です。

Phew! There you have it. I'm so excited about these new-to-me hehe plates and Ya Qin An stamping polishes especially, and I can imagine myself using them often. I actually bought 3 more hehe plates and am waiting for their arrival. Can't wait to use these pretties!

そんな感じで、春の歌から届いた商品の紹介とレビューでした。お初にお目にかかるheheプレートとYa Qin Anスタンピングポリッシュに特に感動。heheプレートは3枚ほど追加でオーダーしたので、そちらも届くのが楽しみです。Ya Qin Anの他のカラーも気になります。これらの商品を使ったネイルは今後少しずつご紹介していきたいと思います。

春の歌でのご購入の際は、「CPM10」と会計時に入力すると10%オフになります(セール品は除く)。送料はいつでも無料です。

にほんブログ村 美容ブログ 自爪ネイルへ

Monochrome Patchwork Typography Mani

Thursday, June 25, 2015 4 Comments A+ a-

July 10th Update: I replaced the video at the end of this post with YouTube version.

What a long & tongue twisting name I gave to today's mani. lol. I always have difficulty coming up with a name for my manis, but I need one when I put the tutorial video on YouTube. I try my best to avoid generic name like 'reverse stamping mani' or 'cute pink mani' or the like. It's just my preference.

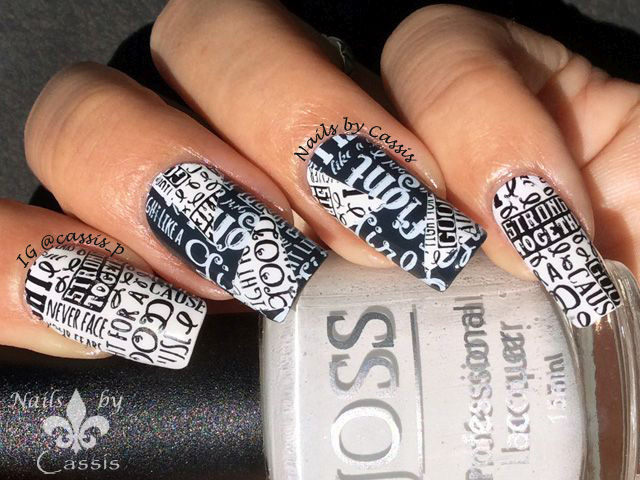
Anyway, for this mani I started off with Sinful Shine Steel Reserve (charcoal gray, almost black) for thumb, middle finger & ring finger. I stamped a typography pattern from UberChic 3-01 plate with Mundo de Uñas White. Then I stamped another typography stamp on the same plate using Mundo de Uñas black and made a decal by applying JOSS Will Not (white). I peeled it off the stamper, cut into random shapes and placed those bits on those nails. For pointer and pinkie, I simply painted white and stamped the same pattern with Mundo de Uñas Black.

I thought this would be a total fail at first. Instead of Steel Reserve, I first tried with JOSS Black Dress, my most opaque blackest black, on my right hand, then stamped white on it. When I topcoated, the white stamp faded! This was the first time I experienced it and I didn't like it. I tried different topcoats to see if it makes any difference, but it turned out that JOSS black was the culprit, so I had to switch to Steel Reserve.

The white stamp on Steel Reserve remained bold after topcoating, but it sort of killed the contrast between it and the white decal on top if you know what I mean. Hmm, I wasn't sure if I liked it or not but I posted on Instagram anyway and got so many positive comments lol! Glad people like it, as their sweet comments helped me gain confidence with this mani :)

7/10更新:記事最後の動画をYouTube版に置き換えました。 

今日のネイル、インスタには数日前にアップしたのですが記事を書くのが遅くなってしまいました。とりあえず出来上がりはこちら。

Finished product, with Glisten & Glow HK Girl topcoat. In the sun

親指、中指、薬指のベースはSinful Shine Steel Reserve(黒にほど近いチャコールグレー)。UberChic 3-01プレートの文字スタンプをMundo de Uñas Whiteでこの3本の指にスタンプ。次に、その隣の文字スタンプをMundo de Uñas Blackでスタンプし、JOSS Will Not(白)を塗ってdecal作成。スタンパーから剥がしたらランダムな形に切って爪に載せる。人差し指と小指は白をベースに同じ柄をMundo de Uñas Blackでスタンプ。仕上げはGlisten & Glow HK Girlトップコート。

使用ポリッシュはこちら。

Polishes used

左から、

JOSS Will Not
Sinful Shine Steel Reserve
Mundo de Uñas White
Mundo de Uñas Black

Can you see the patchwork part? It didn't look obvious to me and I was worried that
people would not recognise it either

このネイルなんですが、色々と紆余曲折がありました。まず、白と黒のくっきりコントラストにしたかったので、このSinfulではなくJOSS Black Dressでまず試したんです。JOSS Black Dressは黒というより「漆黒」と呼びたいぐらいの色です。これをベースにして白スタンプし、その上に白decalを乗せてトップコートしたところ・・・なぜか白スタンプの色が薄くなってしまった。。。トップコートが悪かったかな?と思って別のも試したのですが、結局Black Dressのせいだと分かり、黒ではないけれど黒に近いSinfulのSteel Reserveにチェンジ。

I haven't used typography stamps for along time! These stamps from UberChic plate are
one of the coolest I have in my stash

で、チェンジした結果トップコート後も白スタンプがきちんと浮き上がってくれたのですが、今度は色を反転したdecalとのコントラストがあまりなくなってしまった・・・。一見して、decalが乗っているのを気付かない人が多いんじゃないかな~と思いましたが、「ちゃんと見えてるよ!」との暖かいコメントをいただいてホッ。それまでは正直、「いや~失敗した。このネイル、アップしたくないわー。。」なんて思ってましたよw どんなネイルでも優しいコメントを残してくださるいつもの皆さんはともかく、知らない方たちからもたくさんコメントをいただいて意外と好評でした。自分の自信作にはあまり「いいね」が付かず、イマイチな作品が好評だとちょっと自分の感性を疑うんですが(;▽;)

というわけでモノトーンパッチワークネイルでした。文字スタンプはかなり久々でしたが、このUberChicの文字スタンプはちょっとオサレな感じで気に入っています。


にほんブログ村 美容ブログ 自爪ネイルへ

Silver x Purple Paisley Mani

Saturday, June 20, 2015 8 Comments A+ a-

July 5th Update: I replaced the video at the end of this post with YouTube version.

Happy Saturday! Although we still have very cold days, we get nice sunny days every now and then. I like taking my nail photos in the sun, so I quickly created a mani and took photos while sun is still out.

For this mani, I started off with Picture Polish dary (black holo) and imperial (purple glitter), and I made a decal out of paisley-looking pattern on MoYou London Fairytale 13 using Mundo de Uñas, and coloured in with Picture Polish imperial and o'hara (red holo). Once the decal is dry, I cut it on an angle and placed it onto thumb, middle finger & ring finger. For pointer and pinkie, I simply added triangle studs. I finished off with Glisten & Glow HK Girl topcoat.

This MoYou London plate is another prize I won from their twitter trivia. Yep, I still do the trivia almost every week, but it was a long time ago I won the last plate. It doesn't bother me if I don't win as the trivia itself is quite fun to do. This Fairytale plate has both cute and gorgeous patterns and this pattern I used is just the type of design I adore. I'd like to thank MoYou London for the wonderful plate! <3

7/5更新:記事最後の動画をYouTube版に置き換えました。 

相変わらず寒い日が続いていますが、たまに見事な冬晴の日があったりすると「ネイル作って写真撮らなきゃ!」という気持ちにさせられます。以前はライトボックス内でネイル写真を撮っていたのですが、やっぱり太陽光下で撮るのが好きです。そんなわけでこの日も「陽があるうちに」と思って作成したのがこちらのネイル。

Finished product, with Glisten & Glow HK Girl topcoat. In the sun
ベースはPicture Polish dary(黒ホロ)とimperial(紫グリッター)。MoYou London Fairytale 13プレートのペイズリー風の柄をMundo de Uñas Silverでスタンプし、Picture Polish imperialとo'hara(赤ホロ)で色付けしてdecal作成。乾いたらスタンパーから剥がして斜めに切り取り、これを親指、中指、薬指に乗せる。人差し指と小指には三角スタッズを追加してGlisten & Glow HK Girlトップコートで仕上げ。

使用ポリッシュはこちら。

Polishes used

左から、

Picture Polish imperial
Picture Polish darcy
Picture Polish o'hara
Mundo de Uñas Silver

This is the plate I won. See what I mean by it's a mixture of cute & gorgeous images?

ちなみに今回使ったこのMoYou Londonのプレート、久々にTwitterトリビアでもらったものです。何か月ぶりかな?小人さんが可愛らしいプレートですが、靴の柄がゴージャスなので気になっていました。

I get lots of compliments about this purple on Instagram. Yes, it's a fabulous colour, but
I had to admit these photos don't show the colour accurately. Photos show more bluey-purple,
but the actual colour is more purple-purple

この紫、いい色だね~とたくさんのコメントをいただいたのですが。実は今回載せた写真、どれも色味が正確ではありません・・。写真では青みが強く出てしまっていますが、もっと紫っぽい紫(笑)です。カメラのモニターだと正確な色が出ているのに、PCで見るとダメなんだよな~。なんで?(;▽;)

How do you call the pattern I used? Is it safe to say paisley?

いつもネイルの名前を付けるのに苦慮するのですが、今回もそう。一応「ペイズリー」としちゃいましたが、よかったのかどうか。まぁ他に思いつかないのでよしとする。

プレート数が多くなるにつれてMoYou Londonのプレートを使う機会も相対的に減ってきていますが、久々に戻るとやっぱりいいね、MoYouは。彫りが浅かったりいろんな方向にスクレイプしないと柄がきちんと拾えないプレートと格闘した後にMoYouを使うと違いが歴然。スクレイプしたときのゴリッとした感覚は「あ~やっぱりMoYouはしっかり彫られてるな」と再認識させてくれます。ポンドが下がったらもうちょっと買おう。

Bonus shot :D Our chickens keep laying some eggs, we've got 6 so far!
I saw another egg lying in the cage but I couldn't get it out and left it overnight.
Next morning it was gone :( Looks like they ate it again!

最後にカシス家の卵通信(笑。うちのニワトリさんたち、順調に卵を生んでおります。これは4個目と5個目と6個目。5個目と6個目は小さ目サイズなので、2羽いる小さい雌鶏が生んだのかな?6個目を回収したときにもう1つ卵があったのですが、取り出せない位置にあったのでそのまま放置して翌日見たらもうなかった・・・。また食べたか、おまいら!明日の昼は卵サンドに決定。


にほんブログ村 美容ブログ 自爪ネイルへ

Wearing Blue for ALS Awareness

Monday, June 15, 2015 8 Comments A+ a-

June 28th Update: I replaced the video at the end of this post with YouTube version.

Have you heard of ALS? It's a nervous system disease that causes muscle weakness and impacts physical function. I only vaguely knew about this disease when I saw people doing bucket challenge on TV, but never ever had the chance to know more about it. When Rose @happilyeverose DMed us nail artists on Instagram asking to raise awareness for this disease, I checked about this disease and so shocked to know how horrible this disease is.

Blue is the awareness colour for this disease, so here's what I created. For this mani, I started off with Picture Polish pharaoh (gold holo) for pointer, middle finger & ring finger. Then I placed a french guide tip on an angle on those nails and painted darcy (black holo) and freya's cats (blue holo) over the tape, and peeled off immediately. I topcoated then put the tapes over the gold and black part, revealing only the blue part. I stamped a necklace chain pattern from Pueen26 plate on the blue part using Mundo de Uñas Gold, and finished off with Glisten & Glow HK Girl topcoat. For thumb and pinkie, I simply painted freya's cats and added square and round gold studs.

I chose this chain stamp in the hope that this disease gets a 'chain of support', just like the bucket challenge. I pray for those who suffer from this horrible disease.

6/28更新:記事最後の動画をYouTube版に置き換えました。 

今回のネイルは啓蒙を目的としたネイルです。ALS(筋萎縮性側索硬化症)という病気をご存知でしょうか?脳からの命令を筋肉に伝える運動神経細胞が侵される病気で、意識レベルは正常なのに体が思うように動かせなくなっていく恐ろしい病気です。少し前にテレビで著名人がバケツチャレンジをやっていたのを覚えている方もいるかと思いますが、あれはこの病気のためのキャンペーンでした。先日インスタグラムでRoseさん @happilyeverose からこの病気の啓蒙に協力してほしいというDMが届いていたので、初めてこの病気のことを詳しく調べてみました。それまではバケツチャレンジのこともすっかり忘れていました。この病気の啓蒙色は青ということで、青をメインにしたネイルを作成してみました。出来上がりはこちら。

Finished product, with Glisten & Glow HK Girl topcoat. In the sun

人差し指、中指、薬指のベースはPicture Polish pharaoh (ゴールドホロ)。この3本の指にフレンチガイドを斜めに置き、上からdarcy (黒ホロ)とfreya's cats (青ホロ)を塗ってすぐにガイドを剥がす。ここでいったんトップコートし、金と黒の部分をテープで隠して青の部分だけが見えるようにする。青の部分にネックレスの鎖柄をMundo de Uñas Goldでスタンプし、Glisten & Glow HK Girlトップコートで仕上げ。親指と小指にはfreya's catsを塗り、四角スタッズと丸スタッズを追加。

使用ポリッシュはこちら。

Polishes used

左から、

Picture Polish pharaoh
Picture Polish freya's cats
Picture Polish darcy
Mundo de Uñas Gold

I haven't tried a negative space mani yet, but couldn't bring myself to doing it just yet.
This Picture Polish pharaoh is so sheer, it gives a negative space look and I love it <3

このネックレスチェーンの柄を選んだ理由。「この病気に対する支援の輪が鎖のように繋がっていきますように」という想いを込めました。人から人へチャレンジの輪が広がっていくバケツチャレンジも同じですよね。

I'm just so in love this fabulous blue holo. I will have to grab more when it runs out!

ちなみにベースに使った金ホロ、だいぶシアーなので、ふと「このポリッシュでまだやったことのないnegative space風のネイルができないかな?」と思い立ちました。negative spaceネイルというのは、素爪が若干見えているネイルのことです。日本語だと何ていうんでしょう・・?素爪を見せる勇気がなかったのでこのシアーなpharaohを使ってみました。素爪感もありつつ、でも陽が当たるとホロがキラキラ。いいよいいよ~。結構気に入りました。

この青ホロも綺麗ですね。なくなったら買い足し決定。Picture Polishは乾くと表面がツルンとコーティングされた感じになるので、テープを載せても剥がれにくいしどの爪にトップコートを塗ったか一瞬忘れてしまうぐらいツヤツヤでした。しかも今回、スタンプが失敗したときのためにスタンプ前にトップコートしましたが、トップコートしなくてもMundoがきちんと剥がれてくれましたよ(←右手で試した)。やっぱりお値段高めだけあって良質な液を使ってるね、PP。

というわけでALS啓蒙ネイルでした。治療法がまだ確立していないこの病気。より一層研究が進んで病気に苦しむ方々が日常を取り戻せますように。


にほんブログ村 美容ブログ 自爪ネイルへ